The Design Process

“The design process brings order to what can otherwise be a chaotic learning environment. It provides structure for the unstructured and the ambiguous. For some students, less interested in tinkering and making for its own sake, it can also provide a purpose, as they wrestle with thorny problems and come up with practical solutions to prototype in the Makerspace.”

Author: Sylwia Bielec — The Design Process: The backbone of school Makerspaces

design process
Click to view in Google Drive

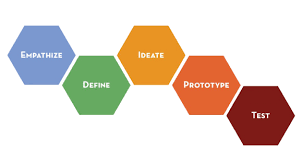
The Design Process can encourage students to be more creative, productive, and accurate. It is a great way to frame your Genius Hour/ Passion Projects or Open Creatve Space (OCS). Here is a graphic showing the 5 steps of the design process. An individual might go through these steps multiple times during the creation process.

The Design Process and Universal Design for Learning (UDL)  go hand-in-hand with empathy at the forefront.

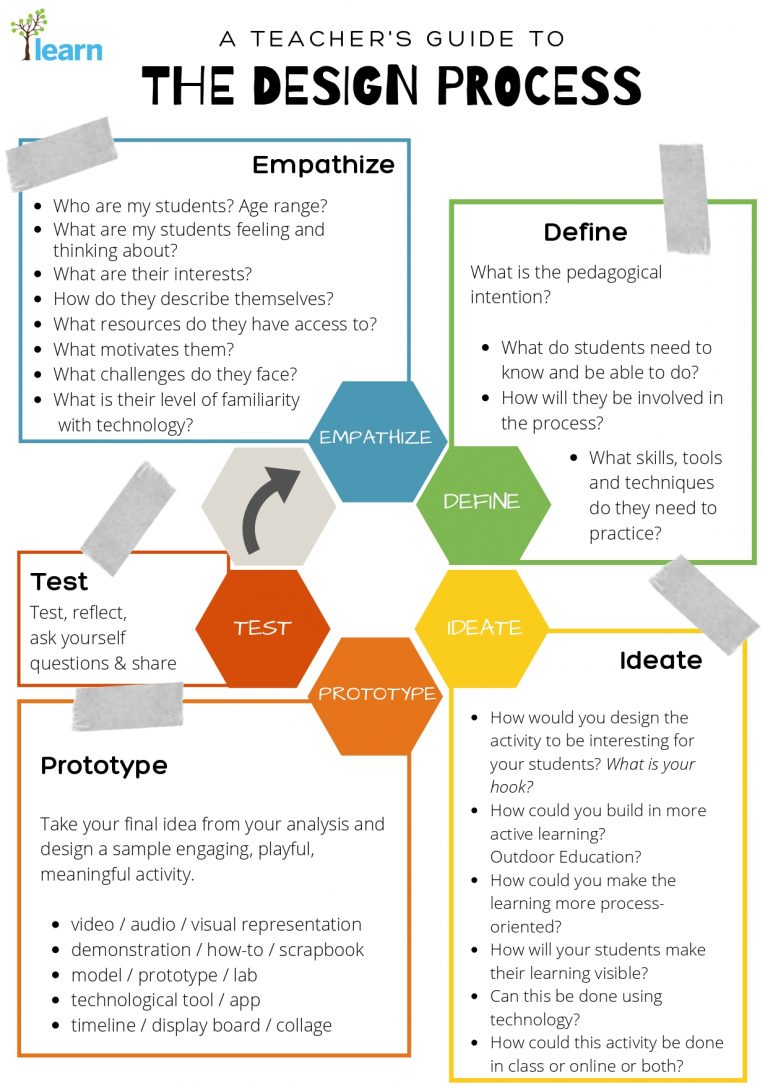
Below is a Teacher’s Guide to the Design Process. We also created this Google docs version with space on the right so that you can answer and reflect on the questions that accompany each stage.

It can help to integrate different tools and technology during the Design Process. You may want to browse through these online tools.

the 5 steps of the design process, shown in a circle to show that the design process is not linear, but can repeat in the creation process
Click on above image to view in Google Drive

Working with secondary students?

Check out the video and Technological Design Process steps below. You may want to display a Technological Design Process (8×11 or 11×17) poster in your class or OCS. The How Stuff Works and Explain That Stuff websites might also be of interest.

Design a Technological Object

Key Questions to Ponder:

  1. What is the need to be fulfilled?
  2. Can I improve an existing object?

Step 1: Suggest an explanation

  • My idea: I explain in my own words what I know about the need to be fulfilled or the object to be improved.
  • My possible solution: I imagine my prototype… I imagine the operation principle… I use words and sketches to illustrate my idea.

Step 2: Plan and Produce a prototype

  1. Materials: I list what materials I will need to build my prototype and determine if the materials, tools, and equipment are readily available.

           2. Development: I choose the materials to produce the prototype and then proceed to the following questions:

  • What are the main parts to be made
  • How will I assemble my prototype
  • What are the appropriate techniques?
  • What precautions do I need to take
  • What should I note and when?

          3. Action: I proceed to:

  • Create the prototype according to my plan.
  • Adjust the plan as needed and note the adjustments.
  • Perform tests to check the prototype.

Step 3: Working out explanations and concluding

  • I evaluate my prototype based on the characteristics in my plan.
  • I communicate how I have solved the problem using the correct scientific terminology.
  • Did I use the right terms and respect the rules and conventions to express my idea?
  • I describe what I learned from this activity.
Skip to content